10 Fashion Trends to Look Forward in India 2023
What are you going to wear in 2023? While climate change may slow fashion’s quick pace, trends continue to be important in setting the tone for each new season.Following Barbiecore, Y2K, and workwear, here are the ten fashion trends that will see you through 2023 in style.
Fashion Trends to Look Forward in India 2023
Trouser Suits
We’ve lost count of how many times its comeback has been announced since the outbreak began, but it’s apparent that the suit will be a staple of 2023 wardrobes. During the most recent round of fashion shows, many designers placed suits back in the forefront, although in more relaxed forms. Far from the tight suits we’re used to, bigger shapes will be popular next year, as seen at Acne Studios, Stella McCartney, and Dries Van Noten. The most enticing style, though, is the loose-fit jacket worn with mismatched pants or, better yet, a plain pair of pantyhose.
Step 1: Measure and Cut the Fabric
Measure the individual who will wear the outfit precisely. Measure the bust, waist, hips, and inseam length. Based on these measurements, cut the fabric for the trousers and the suit jacket. Use a pattern or create your own by tracing and adjusting the pieces on the fabric.
Step 2: Sew the Trousers
Start by sewing the trouser pieces together, following the pattern or your design. Sew the inner and outer leg seams first, and then attach the waistband. Add pockets if desired. Hem the bottom of the trousers to the correct length according to the wearer’s height.
Step 3: Assemble the Suit Jacket
Begin by sewing the main pieces of the suit jacket together – front panels, back panel, and sleeves. Then, attach the lining to the jacket’s main pieces. Add any desired details such as pockets, buttons, or lapels.
Step 4: Tailoring and Fitting
Once the basic suit is assembled, it’s time for fitting. Have the wearer try on the suit to assess the fit and make any necessary adjustments. Tailor the suit to ensure it fits perfectly, taking in or letting out seams as needed.
Step 5: Finishing Touches
After the final fitting and adjustments, finish the suit by sewing any remaining details and giving it a professional touch. Press the suit to ensure it is crisp and neat, and make sure all seams and edges are secure. The trouser suit is now ready to wear!
Step 5: Finishing Touches The final step involves finishing the suit to give it a polished look. Press the suit using an iron to remove any wrinkles and create crisp edges. For a proper fit, make any required changes. Trim loose threads, and check for any defects or imperfections that need correction.
Utility wear
While some will wear suits, others will wear utility gear that combines elegance and comfort and is generally characterised by a plethora of pockets. This trend, which is midway between gorpcore and normcore, demonstrates that we will not abandon the informal fashions acquired during the epidemic just yet. Miu Miu and Louis Vuitton are two significant houses that have explored this theme for the spring-summer 2023 season, with the former going for a more subtle look and the latter going for a more extravagant one.
Creating utility wear involves designing functional and practical clothing that serves specific purposes while also being stylish and comfortable. Here are five steps to make utility wear:
Identify the Purpose and Target Audience:
Before designing utility wear, clearly define the purpose it will serve and the target audience it is intended for. Utility wear can range from outdoor adventure clothing to workwear or everyday functional apparel. Understanding the needs of the users and the specific activities they will be engaged in will help guide the design process.
Choose the Right Fabrics:
Selecting the appropriate fabrics is crucial for utility wear. Consider durable and functional materials that offer features such as moisture-wicking, quick-drying, water resistance, breathability, and stretchability. For example, performance fabrics like nylon, polyester, spandex, and technical blends are commonly used in utility wear.
Focus on Practical Features:
Utility wear should have practical features that enhance its functionality. Consider incorporating features such as multiple pockets for storage, reinforced knees and elbows for added durability, adjustable straps or drawstrings for a customizable fit, and ventilation panels for breathability. These features should complement the intended purpose of the clothing.
Optimize Design and Aesthetics:
While utility wear is primarily designed for functionality, aesthetics should not be overlooked. Create a design that aligns with the target audience’s preferences and fashion sensibilities. Balancing functionality and style will ensure that users feel comfortable and confident while wearing the clothing.
Prototype and Test:
After finalizing the design, create prototypes of the utility wear and conduct thorough testing. Involve potential users in wear trials to gather feedback on comfort, fit, functionality, and overall performance. Use the feedback to make necessary improvements and adjustments before proceeding with mass production.
Denim
Already very much present in 2022, denim is going nowhere and will still be on the fashion agenda next year. However, while denim channeled the famous Y2K aesthetic last year—in particular heralding the return of the low-rise waist—it will this time be all about the ’90s, with head-to-toe looks that are cool, loose and laid-back. Denim will be influenced by the utility trend, but not only, since we will also find long denim coats, and classic jackets with exaggerated proportions. This was spotted on the catwalks of Givenchy and Off-White, among others.

Making denim involves a series of complex processes that require specialized machinery and expertise. Here are five general steps involved in the production of denim:
Cotton Selection and Preparation:
The first step in making denim is selecting the right type of cotton. Cotton fibers with longer staple lengths are preferred as they produce stronger and more durable denim fabric.
Once the cotton is selected, it goes through a cleaning and carding process to remove impurities and align the fibers in a uniform manner.
Spinning:
After carding, the cotton fibers are spun into yarns. The spinning process helps to create continuous and consistent yarns that will be used to weave the denim fabric.
Depending on the desired characteristics of the denim, the yarn can be spun in various ways, such as ring spinning or open-end spinning.
Indigo Dyeing:
Indigo dye is the iconic element that gives denim its characteristic blue color. The yarns are dyed using indigo dye in a process called rope dyeing or slasher dyeing.
The yarns are repeatedly dipped into the indigo dye bath to achieve the desired shade of blue. The longer the yarn is left in the dye ,the darker the color will be.
Weaving:
In this step, the dyed yarns are woven together on specialized looms to create the denim fabric. The weaving process involves interlacing the yarns vertically (warp) and horizontally (weft).
Different weaving patterns, such as twill weaves, are used to create the unique diagonal ribbing effect that is characteristic of denim.
Finishing:
After weaving, the denim fabric undergoes various finishing processes to enhance its appearance and texture. Finishing processes may include washing, sanding, brushing, or distressing to create different finishes like stonewashed or distressed denim.
The fabric is then inspected for quality, and rolls of finished denim are ready to be used for the production of jeans, jackets, or other denim products.
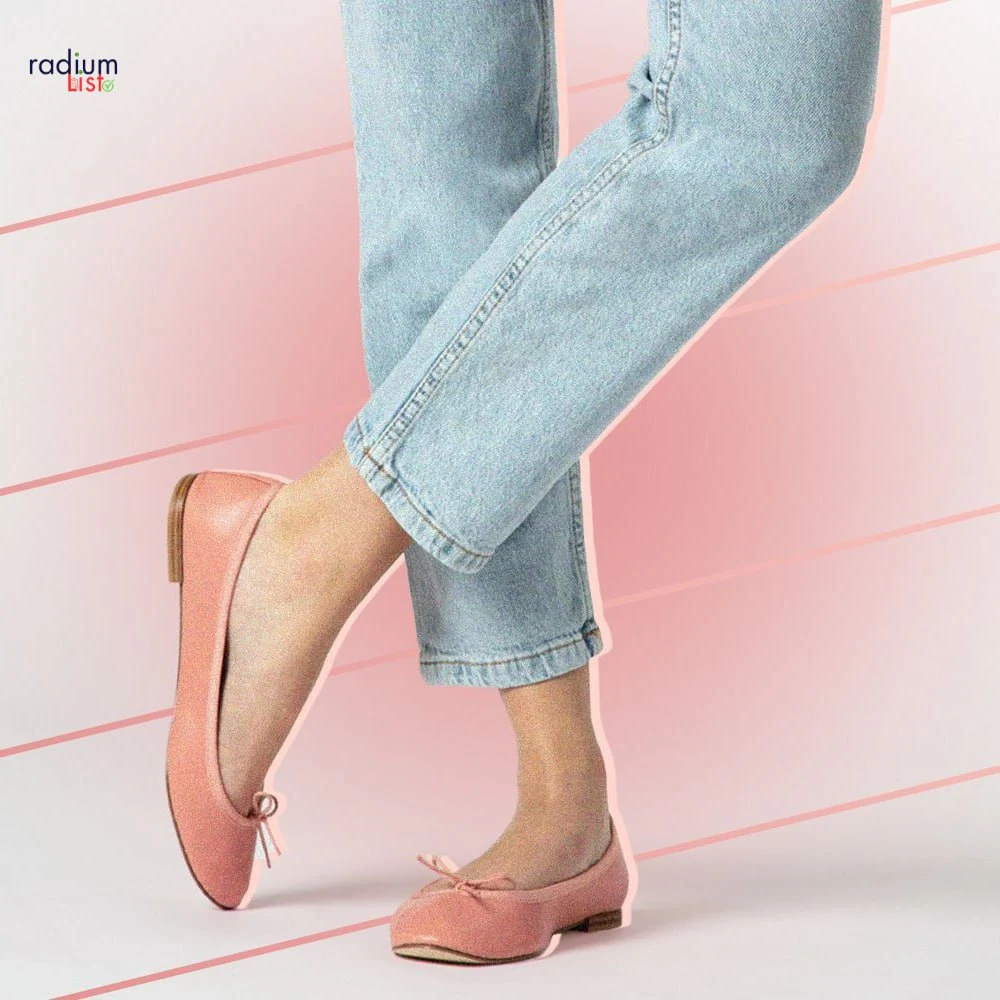
Ballet flats
After the sneakers and chunky combat-style boots of 2022—and which won’t be totally disappearing—it’s time for a more minimalist and sophisticated shoe to move into the spotlight. In the same vein as the balletcore trend, which emerged last fall—and which already has 220 million followers (views) on TikTok—ballet flats will be coming to feet from the of the year. Popularized by the fashion house Miu Miu, ballet flats will be worn with or without socks, and are already proving popular among a crowd of savvy influencers. Note that Mary Janes will also be popular, as will heels, which are expected to go higher.
To make ballet flats, you will need basic sewing skills and access to appropriate materials. Here are five steps to guide you through the process:
Step 1: Gather Materials and Pattern
- Obtain a ballet flat pattern or create one yourself by tracing the outline of your foot on a piece of paper. Ensure the pattern includes the sole and upper part of the shoe.
- Choose suitable materials such as fabric for the upper part, lining material, and a sturdy material like leather or rubber for the sole.
- Gather other necessary supplies, including scissors, pins, sewing machine (or a needle and thread if hand-sewing), and fabric glue.
Step 2: Cut the Fabrics
- Lay your pattern on the selected fabric and cut out two pieces for each foot, ensuring you have a left and right piece.
- For the sole, cut out two pieces from the sturdy material using the same pattern or slightly larger to accommodate the seam allowance.
Step 3: Sew the Upper Part
- Take the two fabric pieces cut for each foot and place them right sides together.
- Pin the edges together, leaving the back opening unsewn.
- Use a Sewing machine or hand-sew along the edges ,leaving enough space at the back to turn the fabric right side out.
Step 4: Attach the Sole
- Place one of the sturdy sole pieces on a flat surface, and apply fabric glue around the edges.
- Carefully align the fabric upper part over the sole, ensuring the edges match up neatly.
- Press down firmly to secure the upper part to the sole, allowing the glue to dry as per the manufacturer’s instructions.
- Repeat this process for the other foot.
Step 5: Finish the Flats
- Once the glue has dried completely, turn the flats right side out through the back opening.
- Check the seams for any loose threads or imperfections and make necessary adjustments.
- Try on the ballet flats to ensure they fit comfortably and make any final alterations if required.
Banarasi silk sarees
Banarasi silk sarees have long been a favorite among saree enthusiasts, and their charm remains as strong as ever in 2023. Renowned for their exquisite craftsmanship, these sarees boast intricate brocade work and stunning gold or silver zari motifs.
In the world of fashion, Banarasi sarees continue to reign supreme, captivating hearts with their timeless beauty. Be it a grand wedding or a joyous festive occasion, draping yourself in these designer sarees guarantees that all eyes will be on you.
Step into the realm of elegance as you explore the mesmerizing range of Banarasi sarees, now available in an array of enchanting colors like pastel yellow and aqua blue. Each saree boasts unique designs that promise to elevate your style and grace to new heights.
With their rich history and unmatched allure, Banarasi silk sarees are a symbol of cultural heritage and artistic brilliance. Wearing one of these sarees is not just donning a garment but embracing a legacy that has enthralled generations. So, indulge in the beauty of Banarasi sarees and let their elegance make you the epitome of grace on any occasion.
Making Banarasi silk sarees is a traditional and intricate process that involves skilled craftsmanship. Here are the key steps involved in
making Banarasi silk sarees:
Silk Filament Production: The process begins with the extraction of silk filaments from silk cocoons. These cocoons are boiled to soften the sericin, a natural gum that binds the filaments together. Skilled artisans then carefully unwind these delicate silk filaments to form threads known as ‘raw silk.’
Dyeing the Silk: After obtaining the raw silk, it is carefully dyed in vibrant colors using natural or synthetic dyes. The selection of colors and the dyeing process are crucial as they determine the final appearance of the saree.
Designing and Weaving: The designing and weaving of Banarasi silk sarees are the most labor-intensive steps. Skilled weavers use handlooms to meticulously weave intricate patterns and motifs into the fabric. These patterns often include traditional designs like floral, paisley, or Mughal-inspired motifs, along with beautiful borders and pallus.
Zari Work: One of the distinguishing features of Banarasi silk sarees is the extensive use of zari work. Zari refers to metallic threads, usually made of silver or gold, which are woven into the saree to create stunning patterns and embellishments. The process of weaving zari is a highly specialized skill that requires precision and patience.
Finishing Touches: The saree goes through a number of finishing procedures after the weaving is finished. These include cutting the saree to its desired length, attaching the intricately woven pallu, and adding any additional embellishments like beads or stones if required. The saree is then carefully inspected for quality and beauty before it is ready for sale.
Printed Dress
Creating printed dresses can be a fun and creative process. Here are five steps to guide you through making your own printed dress:
Step 1: Design and Inspiration
Start by brainstorming and sketching your dress design. Consider the style, silhouette, and the type of print you want. Look for inspiration from fashion magazines ,websites ,or even nature and art. Decide on the color scheme and the overall theme of your print.
Step 2: Selecting Fabric
Choose a suitable fabric for your dress. Lightweight and Flowy Fabrics like cotton ,silk ,or rayon work well for summer dresses ,while heavier fabrics like wool or denim are better suited for colder seasons. Ensure the fabric is pre-washed and ironed before starting the printing process.
Step 3: Printing Technique
Decide on the printing technique you want to use. Some popular options are block printing, screen printing, or even digital printing. Each technique requires different materials and methods, so research and gather the necessary tools and supplies accordingly. For example, if you choose block printing, you’ll need carving blocks, fabric ink, and carving tools. If you opt for screen printing, you’ll need a screen, stencil, and screen printing ink.

Step 4: Test and Prepare
Before printing on the final fabric, it’s crucial to do a test run on a scrap piece of fabric. This will help you adjust the colors ,alignment ,and pressure for a perfect print. Once you are satisfied with the test print, prepare your dress fabric by laying it out flat on a clean surface and securing it in place.
Step 5: Print Your Dress
Now, it’s time to print your dress! Carefully apply the ink to the printing surface, whether it’s a block, screen, or other medium. Gently and evenly press the printing medium onto the fabric. Repeat the process to create the desired pattern all over the dress. Allow the ink to dry completely before moving the fabric.
Glitter
Making glitter dresses can be a fun and creative project. Here’s a simple guide on how to make glitter dresses in 5 steps:
Step 1: Choose the Base Dress
Select a plain dress as the base for your glitter creation. It’s best to choose a dress made of a fabric that can easily adhere to glitter, such as cotton ,satin ,or tulle. You can either purchase a new dress or recycle an old one to give it a glamorous makeover.
Step 2: Prepare the Dress
Before applying glitter ,make sure the dress is clean and free from any dust or dirt. If needed, wash and iron it to ensure a smooth surface for the glitter.
Step 3: Apply Glue or Fabric Adhesive
To Add glitter to the dress ,you’ll need to apply a fabric adhesive or glue that is suitable for your chosen dress material. Use a brush or sponge to spread the glue evenly on the areas you want to glitter. You can choose to apply glitter to the entire dress or create specific patterns and designs.
Step 4: Add Glitter
Sprinkle the glitter over the glued areas while the adhesive is still wet. Gently press down on the glitter to ensure it sticks to the dress firmly. You can use one color of glitter or create a more dazzling effect by mixing different shades.
Step 5: Let it Dry
Allow the dress to dry completely before wearing or handling it. The drying time will depend on the type of adhesive used ,so refer to the product instructions. Once dry, gently shake off any excess glitter. If desired, you can also apply a clear fabric sealer or spray to lock the glitter in place and prevent it from shedding.
Chikankari Kurti
A Chikankari Kurti is a type of traditional Indian garment that features delicate embroidery known as Chikankari. Chikankari is a form of white floral embroidery that originated in Lucknow, a city in the northern state of Uttar Pradesh, India.
The Chikankari technique involves intricate and intricate hand embroidery using white thread on lightweight fabric such as cotton, muslin, or silk. The embroidery typically consists of various stitches, including the backstitch, chain stitch, and satin stitch, which are used to create floral motifs, paisley designs, and intricate patterns.
Making a Chikankari Kurti involves delicate and intricate embroidery work that is native to Lucknow, India. Here are the steps to make a Chikankari Kurti:
Step 1: Fabric Selection
Choose a suitable fabric for the Kurti, preferably lightweight and breathable fabrics like cotton, chiffon, or georgette, which are commonly used for Chikankari embroidery. The color and texture of the fabric should complement the design you have in mind.
Step 2: Design and Pattern
Decide on the design and pattern you want to create on the Kurti. Chikankari typically involves various traditional motifs like paisleys, flowers, and geometric patterns. You can draw the Design on the fabric using a fabric Pencil or transfer it using a stencil.
Step 3: Embroidery
Thread selection is crucial in Chikankari embroidery. Traditionally, white thread is used on pastel-colored fabrics, but you can experiment with different thread colors to suit your preferences. The embroidery is done using different stitches, such as the backstitch, chain stitch, and the famous shadow work. The artisan needs to be skilled and patient to achieve the intricate details.
Step 4: Washing and Finishing
Once the embroidery is complete, gently wash the Kurti to remove any markings and starch. After washing, iron it carefully on the reverse side to retain the embroidered design’s beauty and prevent damage to the delicate stitches.
Step 5: Stitching and Tailoring
Finally, the embroidered fabric is stitched into a Kurti as per the chosen design and pattern. Professional tailoring is essential to maintain the integrity of the Chikankari work. The Kurti can be styled with various necklines, sleeves, and lengths as per your preference.
Skirts
After several seasons dominated by mini and micro cuts—which won’t disappear completely next season—it’s time to make way for more length. Dresses and skirts will be a few dozen centimeters longer than last year, and will adopt a more minimalist aesthetic. Whether they’re satin, sheer or oversized, they will be among the star pieces of the season,as seen at Givenchy, Acne Studios and Valentino.
Sure, here’s a simple guide on how to make a basic skirt in five steps:
Step 1: Measure and Cut the Fabric
Take your Fabric of choice (cotton ,denim ,etc.) and lay it Flat on a clean surface.
Measure the length from your Waist to the Desired length of the Skirt and add an extra inch for the hem. Mark this length on the fabric using chalk or fabric pen.
Measure your waist circumference and add a few inches for ease and the closure (e.g., zipper or elastic). Divide this measurement by two to get the width.
Draw a rectangle on the fabric using these measurements and cut it out carefully.
Step 2: Sew the Side Seams
Right sides facing each other, fold the material in half lengthwise.
Matching the raw edges, pin the side edges together.
Sew a straight stitch along the pinned edge, starting from the top and stopping at the hemline.

Step 3: Create the Waistband
Fold the top edge of the skirt about 1 inch towards the wrong side and press it to create a neat fold.
Fold the same edge again, this time about the width of your waistband. Press and pin it in place.
Sew a straight stitch along the bottom edge of the fold, leaving a small opening to insert the closure (zipper or elastic).
Step 4: Insert the Closure
If you’re using a zipper, carefully sew it along the opening you left in the waistband. Make sure the zipper teeth are facing downwards.
If you’re using elastic, measure it to fit comfortably around your waist and thread it through the waistband casing using a safety pin.The elastic’s ends should be folded over and tightly stitched.
Step 5: Hem the Skirt
Fold the bottom edge of the skirt about 1/2 inch towards the wrong side and press it.
Fold it again by another 1/2 inch and press.
Sew a Straight stitch along the Folded edge to secure the hem in place.
And there you have it! Your basic skirt is complete. Feel free to customize it with embellishments, trims, or different fabrics to create various styles. Happy sewing!
Leggings
Yikes. We know it’s not a comeback that’s awaited by many,but leggings will be one of the must-have pieces of 2023. The good news is, however, that they will be landing in more daring versions. Farewell to the leggings that previously served as an alternative to sweatpants, as 2023 will turn leggings into a sophisticated fashion piece finished with transparency, sequins and eccentric prints. They’re even set to adopt a flare cut that could prove highly popular. This trend was seen on the catwalks of Gucci and Knwls, and has already been adopted by many celebrities, like Kendall Jenner.
Sure ,here’s a simple guide on how to make leggings in 5 steps:
Step 1: Gather Materials and Take Measurements
Obtain stretchy knit fabric suitable for leggings, like cotton-spandex or polyester-spandex blend.
Measure your hips ,waist ,and inseam to determine the size and length of the leggings.
Step 2: Create Pattern and Cut Fabric
Using your measurements ,create a pattern by drawing the shape of half of a legging (the front or back) on a large piece of paper.
Fold the Fabric in Half and place the pattern on top. Pin it in Place and cut around the edges ,Adding a seam allowance of about 1/2 inch.
Step 3: Sew the Leggings
With the right sides of the fabric facing inwards ,fold the fabric in half along the length of the legging and pin the edges together.
Starting from the waistband, use a serger or a stretch stitch on your sewing machine to sew along the pinned edges ,following the shape of the pattern.
Make sure to leave a small opening at the waistband to insert elastic later.
Step 4: Add the Waistband
Measure and Cut a Piece of elastic that fits comfortably around your waist.
Attach a safety pin to one end of the Elastic and thread it through the small opening left in the waistband.
Once the elastic is all the way through ,overlap the ends and sew them securely together.
Close the small opening in the waistband with a few stitches.
Step 5: Finish the Hem
Try on the leggings and determine the desired length. Mark the length with pins.
Fold the bottom edge of each leg twice to create a clean hem ,and sew it in place.